In Qbix, reusable components are referred to as Tools. They can be placed on any page, and can also be used to add one or more behaviors to existing elements. Tools can contain other tools. Calling Q.activate() on an element activates the tools within it, triggering onActivate events in parents before children, and onInit on children before parents.
Already in Qbix Platform 1.0, you could do a lot with Tools, both with client-side JS and server-side PHP, including rendering templates during their onRefresh event. But you had to load text translations, CSS, and other things manually.
Now in Qbix Platform 2.0, you have new, powerful options that make defining tools a lot easier. Here is what it looks like:
Q.Tool.define({
    "Module/my/tool": {
         js: "{{Module}}/js/tools/my/tool.js",
         css: "{{Module}}/css/tools/my/tool.css",
         text: "Module/content"
    }
});
And then in the js file, define the actual tool:
/**
 * Don't forget to document your tool
 */
Q.Tool.define("Assets/NFT/owned",
    ["Any/required/tools"], // optional
    function _constructor () {
         // css is already loaded
         this.text // <-- already loaded
         this.refresh(function () {

             this.rendering(['foo', 'bar'], changed => {
                  // this can update certain elements of the tool
                  // in a very efficient manner, with requestAnimationFrame
                  this.input.value = changed.foo + changed.bar;
             });
         }); // render the tool

    },
    { // default options
         something: {
            cool: 1
         },
         foo: 4,
         bar: 5,
         onRefresh: new Q.Event()
    },
    ["some", "state", "keys"], // optional
    {  // methods
         refresh: async function () {
               // automatically removes handler when tool is removed:
               Q.onSomeEvent.set(handler, this);
               Module.onSomeOtherEvent.set(handler, this);
               const stream = await Streams.get(...);
               const html = await Q.Template.render("MyModule/mytool/view", {
                    collection: stream.getAttribute('myCollection')
               });
               this.element.innerHTML = html; // set the HTML
               // save references to some elements
               this.input = this.getElementsByTagName('input')[0];
               this.foos = this.getElementsByClassName('Module_mytool_foo');
               // let others run custom code when the tool is ready:
               Q.handle(this.state.onRefresh, tool);
         },
         Q: {
               beforeRemove: function () {
                    // no need to remove event handlers
                    // but you may want to do other cleanup
               }
         }
    }
}

Q.Template.set("MyModule/mytool/view", `
   <select name="something_cool" class="MyModule_mytool_foo">
       <option value="" selected="selected" disabled="disabled"
            {{NFT.attributes.DisplayTitle}}
       </option>
       {{#each collection}}
            '<option value="{{@key}}">{{this.name}}</option>
       {{/each}}
   </select>
`, { text: "MyModule/content" });

// other templates for the tool in edit mode, etc.
Q.Template.set("MyModule/mytool/edit", ...);
Also you can do the following instead, like in Vue:
Q.Tool.define({
    toolName: "path/to/tool.html"
});
And then make tool.html like this:
<script>
   // put your scripts here, they will be executed once on load
   Q.Tool.define("MyModule/tool", function () {
        this.element.innerHTML = await Q.Template.render("MyModule/tool/view", ...);
        this.select = tool.element.getElementsByClassName('MyModule_mytool_foo')[0];
        this.rendering('foo,bar', changed => {
            this.select.value = changed.foo + changed.bar
        });
   }, {
        foo: 1,
        bar: 2
   });
</script>
<style>
   /* put your tool styles here */
</style>
<template data-name="MyModule/tool/view" data-text="MyModule/content">
    <select name="something_cool" class="MyModule_mytool_foo">
       <option value="" selected="selected" disabled="disabled"
            {{NFT.attributes.DisplayTitle}}
       </option>
       {{#each collection}}
            '<option value="{{@key}}">{{this.name}}</option>
       {{/each}}
   </select>
</template>
So now the CSS and text and templates are all loaded and processed for you. And you can use promises in your tools.
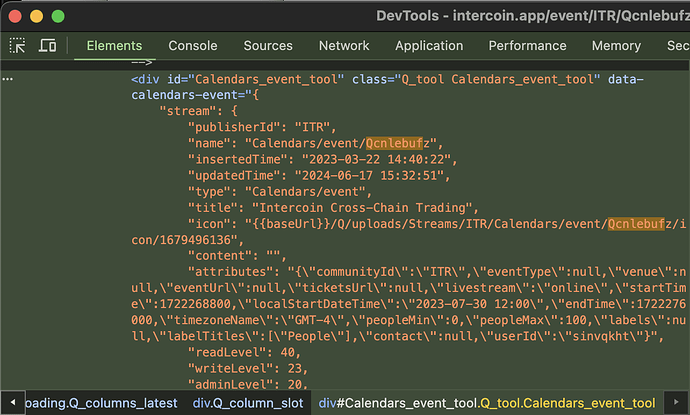
Development Tools
If you open up the Development Tools in a browser like Chrome, your tool options are nicely laid out as JSON inside an HTML attribute:
You can also access element.Q.tools and Q.Tool.active for activated tools. Try using element.forEachTool(), Q.Tool.onActivate(), and Q.Tool.define.options() for tools that will be activated in the future.
